Updates
- Aug 19, 2022. Updated to Get 2.0
It’s been more than four years since my previous API Client in Swift (archived) post. A lot has changed since then. With the addition of Async/Await and Actors, it’s now easier and more fun than ever to design custom web API clients in Swift. The new version went through a radical redesign and I can’t wait to share more about it.
I’m going to focus on REST APIs and use GitHub API as an example. Before I jump in, here is a quick look at the final result:
// Create a client
let client = APIClient(baseURL: URL(string: "https://api.github.com"))

// Sending requests
let user: User = try await client.send(Request(path: "/user")).value

var request = Request(path: "/user/emails", method: .post)
request.body = ["kean@example.com"]
try await client.send(request)
The code from this article is the basis of kean/Get.
Overview #
Every backend has its quirks and usually requires a client optimized for it. This article is a collection of ideas that you can use for writing one that matches your backend perfectly.
The previous version of the client was built using Alamofire and RxSwift. It was a good design at the time, but with the recent Swift changes, I don’t think you need dependencies anymore. I’m going with Apple technologies exclusively: URLSession, Codable, Async/Await, and Actors.
Implementing a Client #
Let’s start by defining a type for representing requests. It can be as complicated as you need, but here is a good starting point:
public struct Request<Response> {
    var method: HTTPMethod
    var url: URL?
    var query: [String: String]?
    var body: Encodable?
}
To execute the requests, you use a client1. It’s a small wrapper on top of URLSession that is easy to modify and extend. You initialize it with a host making it easy to change the environments at runtime.
public actor APIClient {
    private let session: URLSession
    private let baseURL: URL
    // ..

    public init(baseURL: URL,
                configuration: URLSessionConfiguration = .default,
                delegate: APIClientDelegate? = nil) {
        self.url = url
        self.session = URLSession(configuration: configuration)
        self.delegate = delegate ?? DefaultAPIClientDelegate()
    }
There are two types of send() methods – one for Decodable types and one for Void that isn’t decodable.
extension APIClient {
    public func send<T: Decodable>(_ request: Request<T>) async throws -> T {
        try await send(request, decode)
    }

    public func send(_ request: Request<Void>) async throws -> Void {
        try await send(request, { _ in () })
    }

    private func send<T>(_ request: Request<T>,
                         _ decode: @escaping (Data) async throws -> T) async throws -> T {
        let urlRequest = try await makeURLRequest(for: request)
        let (data, response) = try await send(urlRequest)
        try validate(response: response, data: data)
        return try await decode(data)
    }

    // The final implementation uses a custom URLSession wrapper compatible with iOS 13.0
    private func send(_ request: URLRequest) async throws -> (Data, URLResponse) {
        try await session.data(for: request, delegate: nil)
    }
}
APIClient takes full advantage of async/await, including the new URLSession async/await APIs. It also performs encoding and decoding on detached tasks, reducing the amount of work done on the APIClient.
let value = try await Task.detached { [decoder] in
    try decoder.decode(T.self, from: data)
}.value
Getting back to Codable, I think we, as a developer community, have finally tackled the challenge of parsing JSON in Swift. So I’m not going to focus on it. If you want to learn more, I wrote a post a couple of years ago with some Codable tips – most are still relevant today.
The rest of the code is relatively straightforward. I’m using URLComponents to create URLs, which is important because it percent-encodes the parts of the URLs that need it.
The client works with JSON, so its sets the respective “Content-Type” and “Accept” HTTP header values automatically.
func makeRequest(url: URL, method: String, body: Encodable?) async throws -> URLRequest {
    var request = URLRequest(url: url)
    request.allHTTPHeaderFields = headers
    request.httpMethod = method
    if let body = body {
        request.httpBody = try await Task.detached { [encoder] in
            try encoder.encode(AnyEncodable(value: body))
        }.value
        if request.value(forHTTPHeaderField: "Content-Type") == nil {
            request.setValue("application/json", forHTTPHeaderField: "Content-Type")
        }
    }
    if request.value(forHTTPHeaderField: "Accept") == nil {
        request.setValue("application/json", forHTTPHeaderField: "Accept")
    }
    return request
}
Being able to use async functions right inside the makeRequest() method without all the boilerplate of using closures is just pure joy.
The only remaining bit is a validate() method where I check that the response status code is acceptable. It also gives a delegate a chance to decide what error to throw. Most APIs will have a standard JSON format for errors – this is a good place to parse it.
func validate(response: URLResponse, data: Data) throws {
    guard let httpResponse = response as? HTTPURLResponse else { return }
    if !(200..<300).contains(httpResponse.statusCode) {
        throw APIError.unacceptableStatusCode(httpResponse.statusCode)
    }
}
And that’s it, a baseline APIClient. It already covers most of the needs of most users and there many ways to extend it.
Extending the Client #
Getting the basics right is usually easy, but what about more advanced use-cases?
User Authorization #
Every authorization system has its quirks. If you use OAuth 2.0 or a similar protocol, you need to send an access token with every request. One of the common ways is by setting an “Authorization” header.
One of the advantages of Alamofire is the infrastructure for adapting and retrying requests which is often used for authorization. Reimplementing it with callbacks is no fun, but with async/await, it’s a piece of cake.
The first piece is the client(_:willSendRequest:) delegate method that you can use to “sign” the requests.
final class YourAPIClientDelegate: APIClientDelegate {
    func client(_ client: APIClient, willSendRequest request: inout URLRequest) {
        request.setValue("Bearer: \(accessToken)", forHTTPHeaderField: "Authorization")
    }
}
If you look at
setValue(_:forHTTPHeaderField:)documentation, you’ll see a list of Reserved HTTP Headers that you shouldn’t set manually. “Authorization” is one of them…URLSessionsupports seemingly every authorization mechanism except the most popular one. Setting an “Authorization” header manually is still the least worst option.
The
client(_:willSendRequest:)method is also a good way to provide default headers, like “User-Agent”. But you can also provide fields that don’t change usinghttpAdditionalHeadersproperty ofURLSessionConfiguration.
If your access tokens are short-lived, it is important to implement a proper refresh flow. Again, easy with async/await.
private func performRequest<T>(attempts: Int = 1, send: () async throws -> T) async throws -> T {
    do {
        return try await send()
    } catch {
        guard try await delegate.client(self, shouldRetry: task, error: error, attempts: attempts) else {
            throw error
        }
        return try await performRequest(attempts: attempts + 1, send: send)
    }
}
I count four suspension points. Now think how more complicated and error-prone it would’ve been to implement it with callbacks.
Now all you need is to implement a shouldClientRetry(_:withError:) method in your existing delegate and add the token refresh logic.
final class YourAPIClientDelegate: APIClientDelegate {
    func shouldClientRetry(_ client: APIClient, withError error: Error) async -> Bool {
        if case .unacceptableStatusCode(let status) = (error as? YourError), status == 401 {
            return await refreshAccessToken()
        }
        return false
    }

    private func refreshAccessToken() async -> Bool {
        // TODO: Refresh access token
    }
}
The client might call
shouldClientRetry(_:withError:)multiple times (once for each failed request). Make sure to coalesce the requests to refresh the token and handle the scenario with an expired refresh token.
I didn’t show this code in the original APIClient implementation to not over-complicate things, but the project you find at GitHub already supports it.
If you are thinking about using auto-retries for connectivity issues, consider using
waitsForConnectivityinstead. If the request does fail with a network issue, it’s usually best to communicate an error to the user. WithNWPathMonitoryou can still monitor the connection to your server and retry automatically.
Client Authorization #
On top of authorizing the user, most services will also have a way of authorizing the client. If it’s an API key, you can set it using the same way as an “Authorization” header. You may also want to obfuscate it, but remember that client secrecy is impossible.
Another less common but more interesting approach is mTLS (mutual TLS) where it’s not just the server sending a certificate – the client does too. One of the advantages of using certificates is that the secret (private key) never leaves the device.
URLSession supports mTLS natively and it’s easy to implement, even when using the new async/await API (thanks, Apple!).
final class YourTaskDelegate: URLSessionTaskDelegate {
    func urlSession(_ session: URLSession, didReceive challenge: URLAuthenticationChallenge)
        async -> (URLSession.AuthChallengeDisposition, URLCredential?) {
        let protectionSpace = challenge.protectionSpace
        if protectionSpace.authenticationMethod == NSURLAuthenticationMethodServerTrust {
            // You'll probably need to create it somewhere else.
            let credential = URLCredential(identity: ..., certificates: ..., persistence: ...)
            return (.useCredential, credential)
        } else {
            return (.performDefaultHandling, nil)
        }
    }
}
The main challenge with mTLS is getting the private key to the client. You can embed an obfuscated .p12 file in the app, making it hard to discover, but it’s still not impenetrable.
SSL Pinning #
The task delegate method for handling the server challenges is also a good place for implementing SSL pinning.
There are multiple ways how to approach this, especially when it comes to what to pin. If you pin leaf certificates, you sign up for constant maintenance because certificates need to be rotated. The simplest option seems to be pinning CA certificates or public keys. Starting with iOS 14, it can be done very easily by adding the keys to the app’s plist file.
HTTP Caching #
Caching is a great way to improve application performance and end-user experience. Developers often overlook HTTP cache natively supported by URLSession To enable HTTP caching the server sends special HTTP headers along with the request. Here is an example:
HTTP/1.1 200 OK
Cache-Control: public, max-age=3600
Expires: Mon, 26 Jan 2016 17:45:57 GMT
Last-Modified: Mon, 12 Jan 2016 17:45:57 GMT
ETag: "686897696a7c876b7e"
This response is cacheable and will be fresh for 1 hour. When it becomes stale, the client validates it by making a conditional request using the If-Modified-Since and/or If-None-Match headers. If the response is still fresh the server returns status code 304 Not Modified to instruct the client to use cached data, or it would return 200 OK with a new data otherwise.
By default,
URLSessionusesURLCache.sharedwith a small disk and memory capacity. You might not know it, but already be taking advantage of HTTP caching.
HTTP caching is a flexible system where both the server and the client get a say over what gets cached and how. With HTTP, a server can set restrictions on which responses are cacheable, set an expiration age for responses, provide validators (ETag, Last-Modified) to check stale responses, force revalidation on each request, and more.
URLSession (and URLCache) support HTTP caching out of the box. There is a set of requirements for a response to be cached. It’s not just the server that has control. For example, you can use URLRequest.CachePolicy to modify caching behavior from the client. You can easily extend APIClient to support it if needed2.
extension APIClient {
    func send<Response>(
        _ request: Request<Response>,
        cachePolicy: URLRequest.CachePolicy = .useProtocolCachePolicy
    ) async throws -> Response where Response: Decodable {
        // Pass the policy to the URLRequest
    }
}
Downloads #
By default, the send() method of APIClient uses data(for:delegate:) method from URLSession, but with the existing design, you can easily extend it to support other types of tasks, such as downloads.
extension APIClient {
    public func download(_ request: Request<Void>) async throws -> (URL) {
        let request = try await makeRequest(for: request)
        let (url, response) = try await session.download(for: request, delegate: nil)
        try validate(response: response)
        return url
    }
}
And if the Request type is not working for you, it’s easy to extend too. You can also just as easily add new request types, or even URLRequest directly if you need to. Although for a typical REST API, Request is all you are ever going to need.
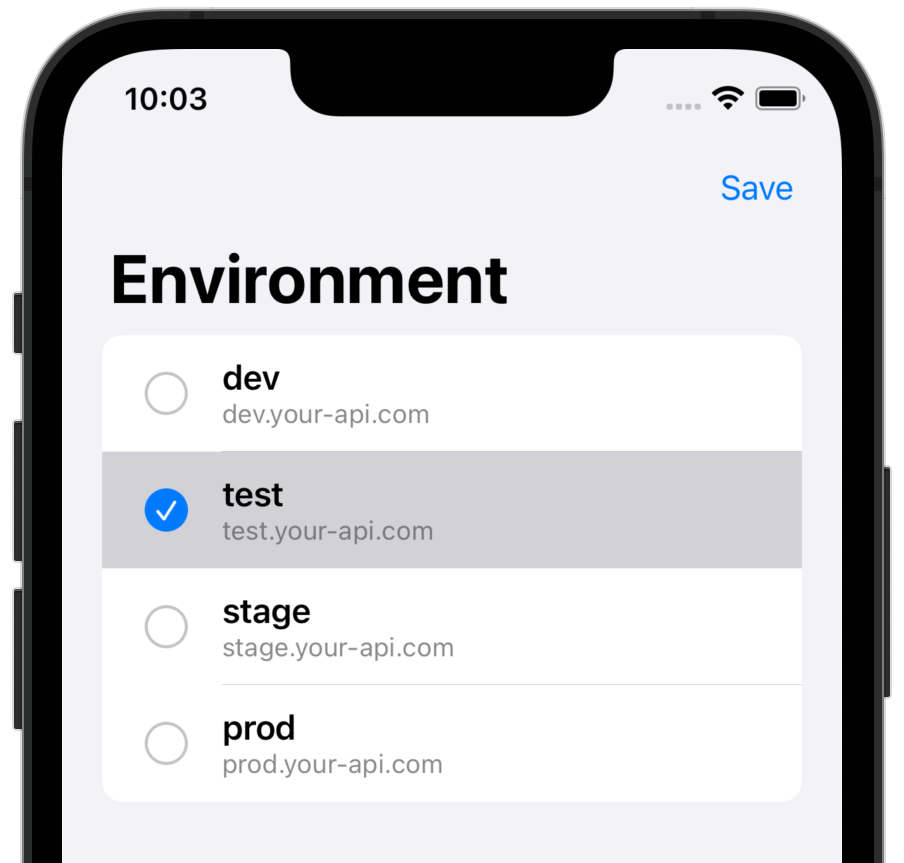
Environments #
APIClient is initialized with a baseURL, making it easy to switch between the environments in runtime. I typically have a debug menu in the apps with all sorts of debug settings, including an environment picker – it’s fast and easy to build with SwiftUI. I added the code generating this screen in a gist.
Defining an API #
For smaller apps, using APIClient directly without creating an API definition can be acceptable. But it’s generally a good idea to define the available APIs somewhere to reduce the clutter in the rest of the code and remove possible duplication.
I’ve tried a few different approaches for defining APIs using APIClient, but couldn’t decide which one was the best. They all have their pros and cons and are often just a matter of personal preference.
REST APIs are designed around resources. One of the ideas I had was to create a separate type to represent each of the resources and expose HTTP methods that are available on them. It works best for APIs that closely follow (REST API design). GitHub API is a great example of a REST API, so that’s why I used it in the examples.
public enum Resources {}

// MARK: - /users/{username}

extension Resources {
    public static func users(_ name: String) -> UsersResource {
        UsersResource(path: "/users/\(name)")
    }

    public struct UsersResource {
        public let path: String

        public var get: Request<User> { .init(path: path) }
    }
}

// MARK: - /users/{username}/repos

extension Resources.UsersResource {
    public var repos: ReposResource { ReposResource(path: path + "/repos") }

    public struct ReposResource {
        public let path: String

        public var get: Request<[Repo]> { .init(path: path) }
    }
}
Usage:
let repos = try await client.send(Resources.users("kean").repos.get)
This API is visually appealing, but it can be a bit tedious to write and less discoverable than simply listing all available calls. I’m also still a bit cautious about over-using nesting. I used to avoid it in the past, but the recent improvements to the Xcode code completion made working with nested APIs much easier. But again, this is just an example.
There are man suggestions online to model APIs as an enum. This approach might make your code harder to read and modify and lead to merge conflicts. When you add a new call, you should only need to make changes in one place.
Tools #
It’s not just Swift that’s getting better. The modern tooling is also fantastic.
OpenAPI #
Remember the infamous Working with JSON in Swift post from 2016? Yeah, we are way ahead now. Ask your backend developers to provide OpenAPI spec for their APIs and use code generation to create Codable entities.
Postman and Paw are great ways to explore APIs. You can import an OpenAPI spec and it will generate a Collection for you so that you have all the APIs always at your fingertips. GitHub API that’s I’m using in the examples also recently git its own OpenAPI spec. You can download it and import it into Postman to try it.
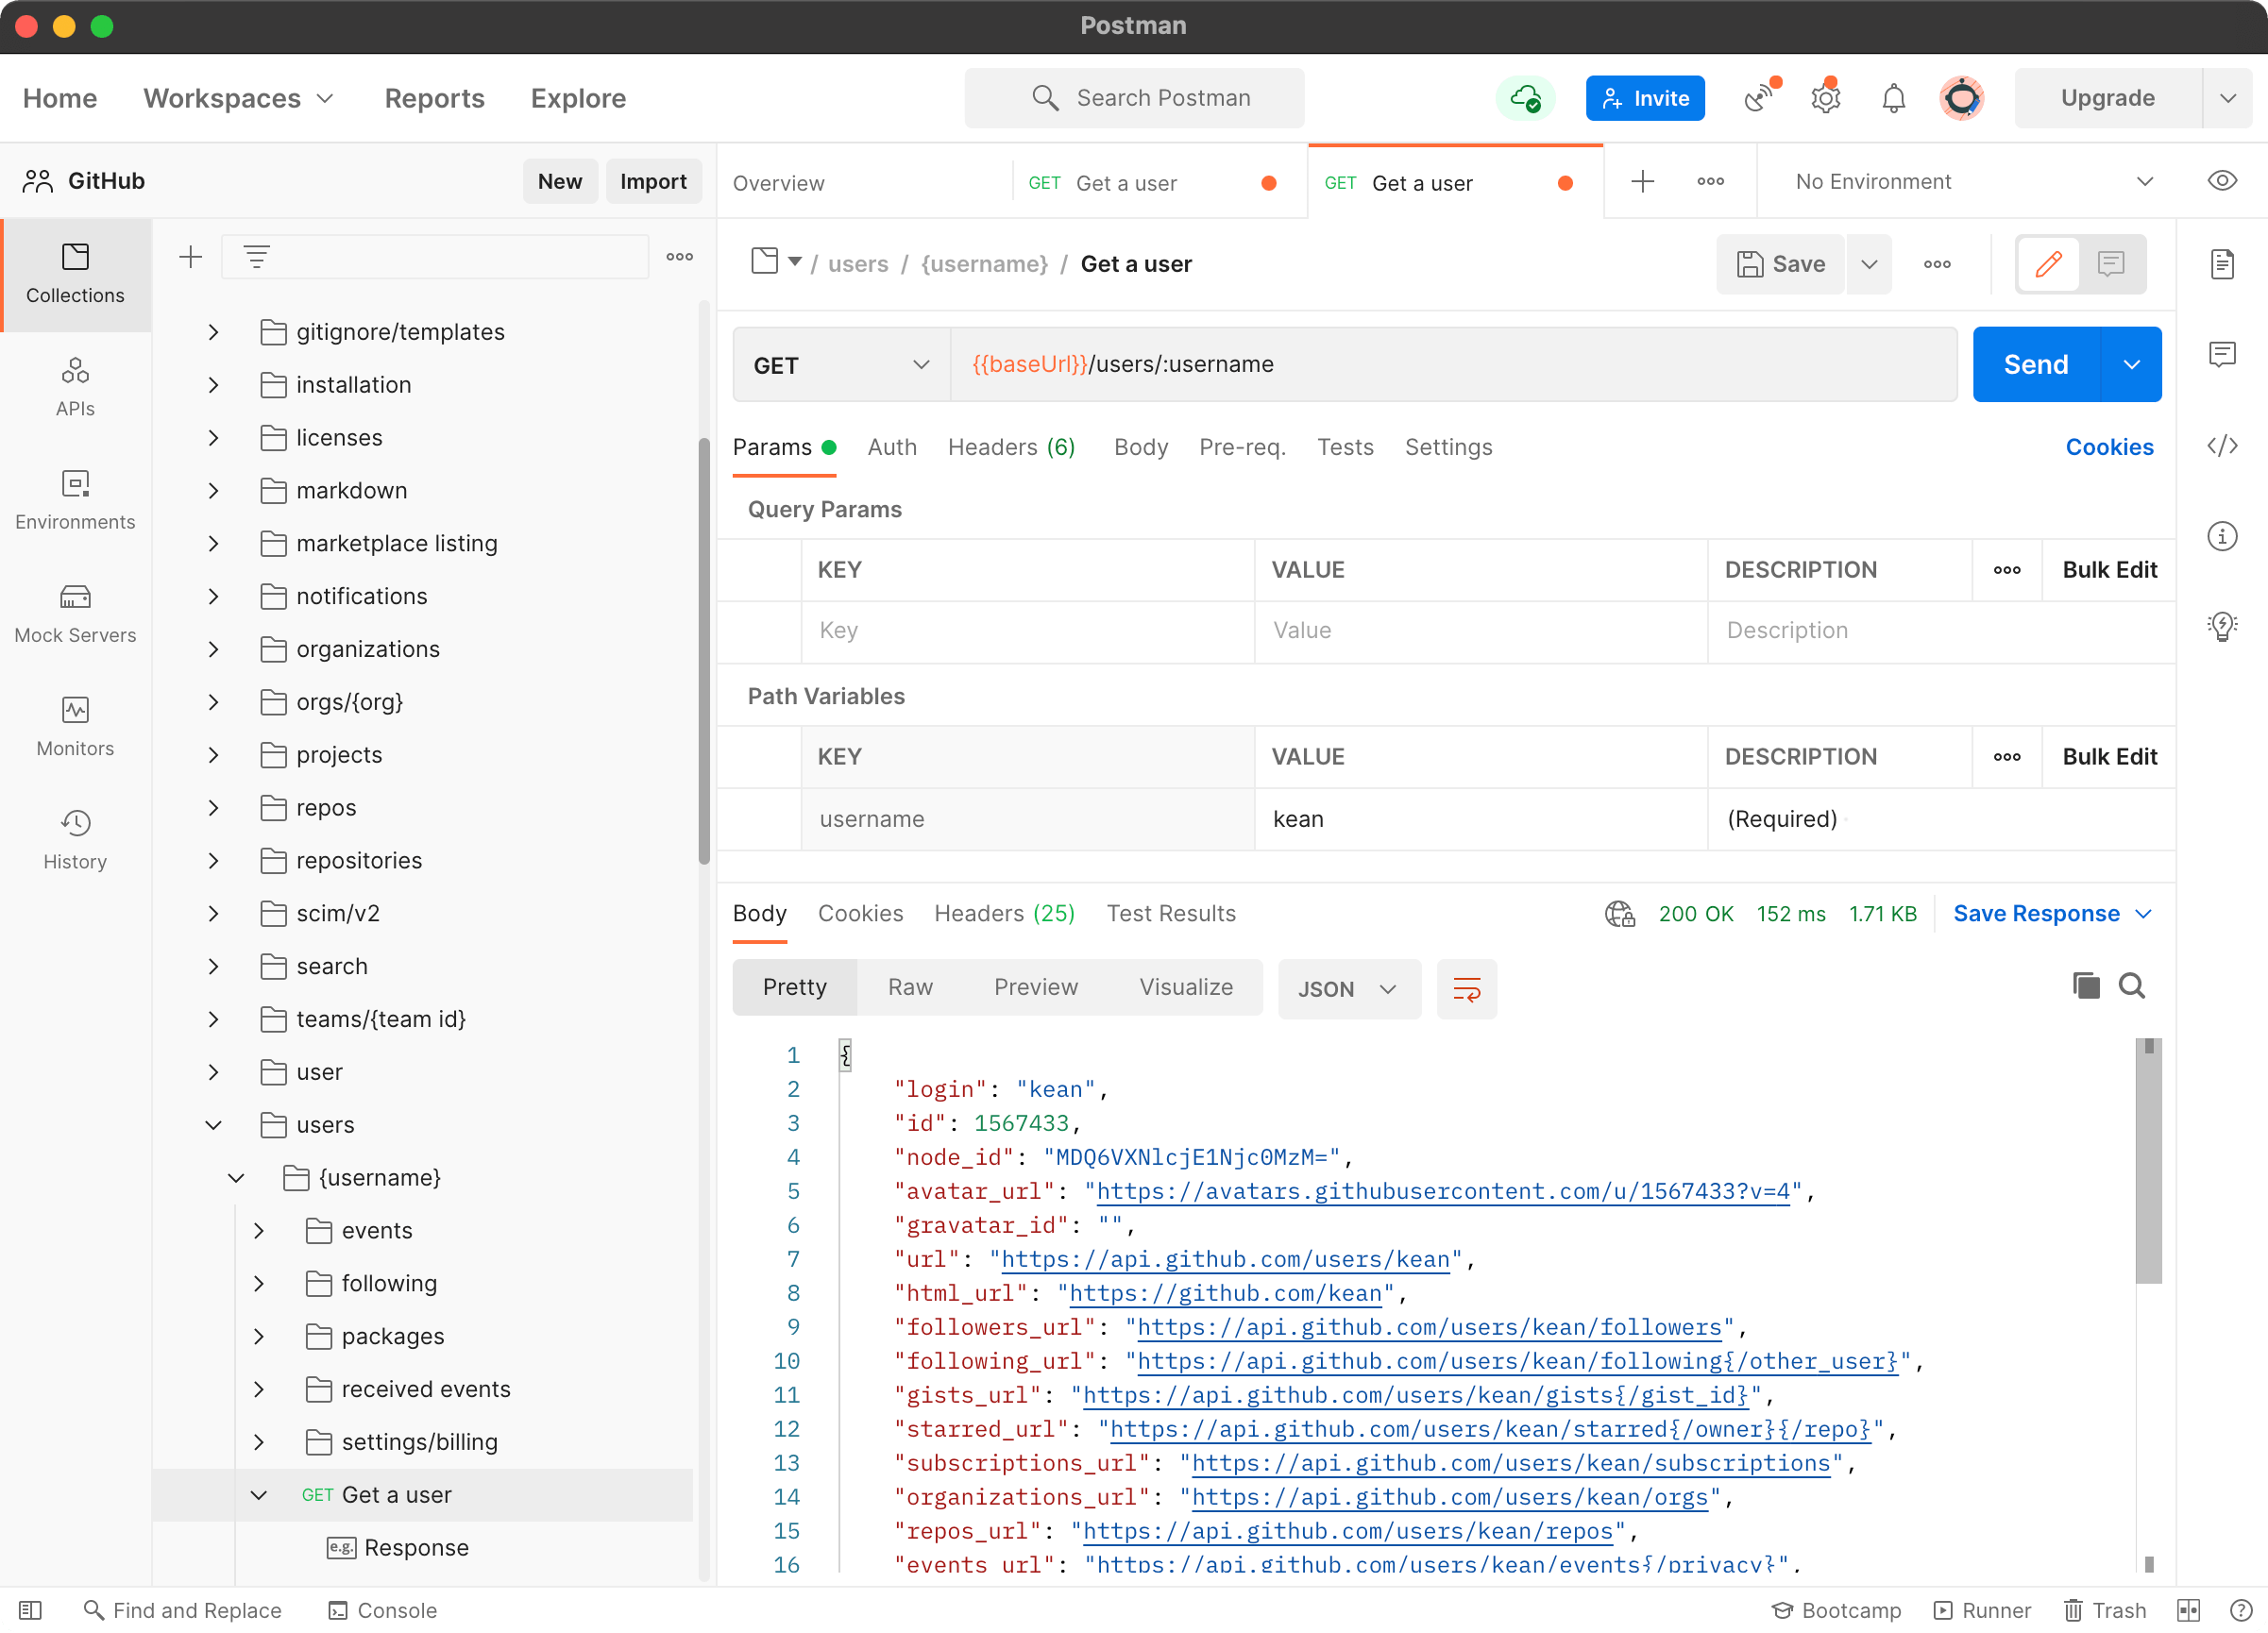
Generating Codable entities is also extremely easy. There are a ton of tools available for working with OpenAPI specs. I also created one optimized for Get, named CreateAPI – check it out.
If you don’t have an OpenAPI spec, you can turn a sample JSON into a Codable struct using quicktype.io and tweak it.
Logging #
Pulse is a powerful logging system for Apple Platforms.
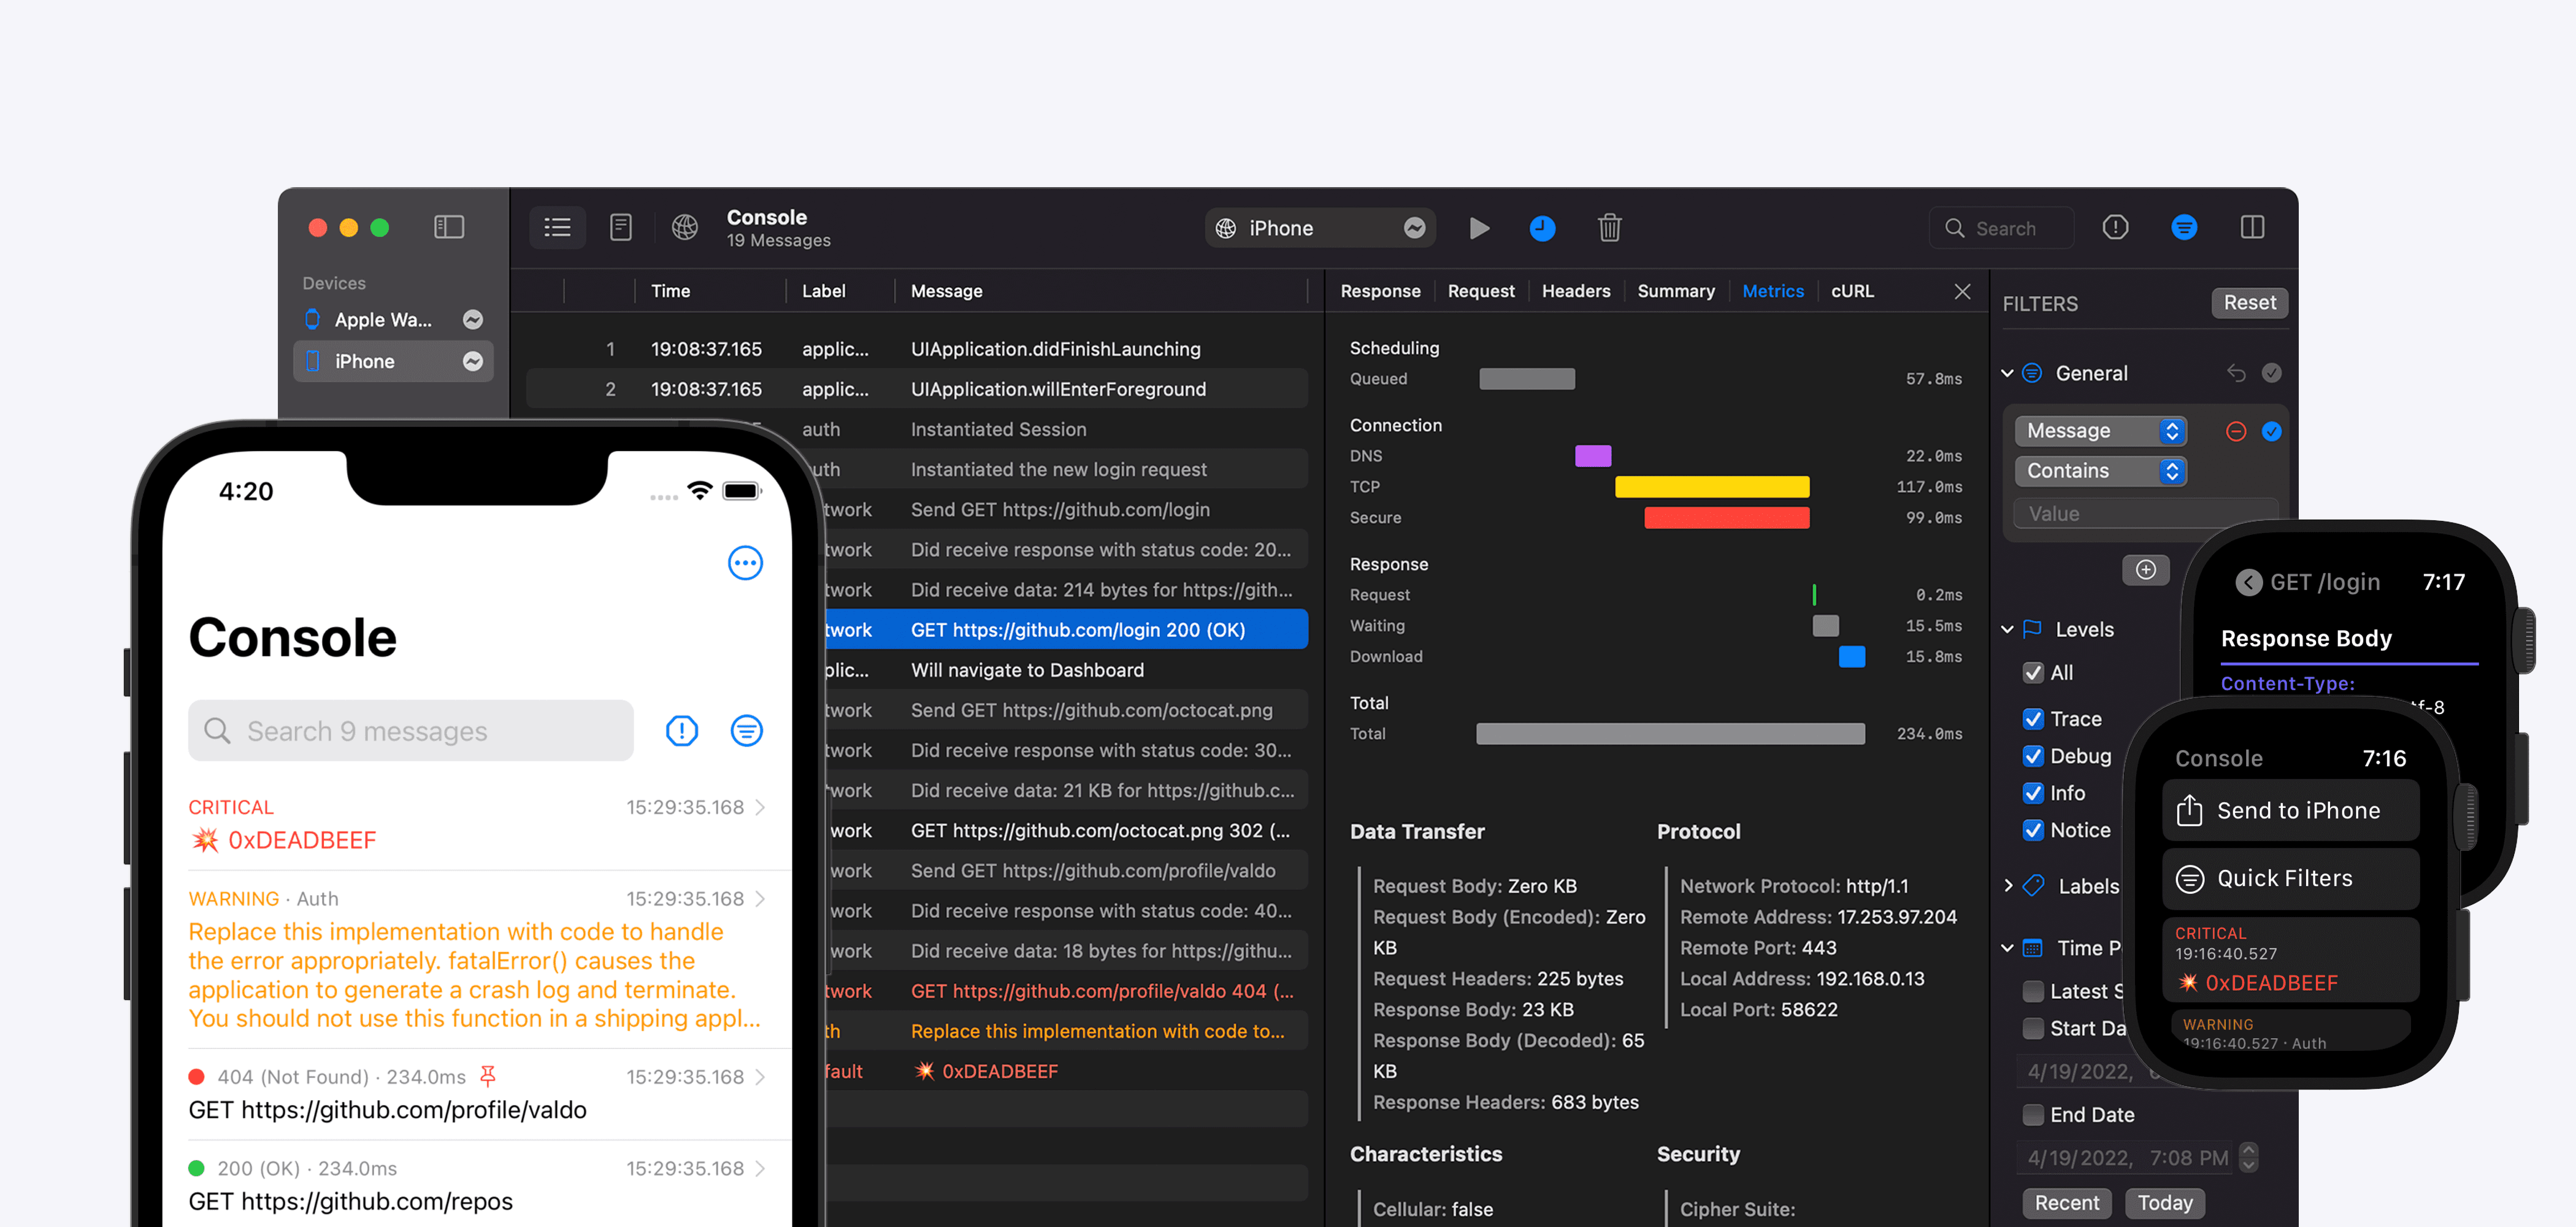
It requests a single line to setup to work with APIClient. The advantage of doing it at that level is that you don’t need to worry about TLS and SSL pinning, and you collect more information than a typical network proxy does thanks to the direct access to URLSession.
let client = APIClient(baseURL: URL(string: "https://api.github.com")) {
    $0.sessionDelegate = PulseCore.URLSessionProxyDelegate()
}
For a complete guide on using Pulse, see the official documentation.
Mocking #
My preferred way of testing ViewModels is by writing integration tests where I mock only the network responses. There are a many mocking tools to chose from. I’m used WeTransfer’s Mocker for unit-testing APIClient itself.
private let host = "api.github.com"

override func setUp() {
    super.setUp()

    let configuration = URLSessionConfiguration.default
    configuration.protocolClasses = [MockingURLProtocol.self]

    client = APIClient(host: host, configuration: configuration)
}

func testGet() async throws {
    // Given
    let url = URL(string: "https://\(host)\(Resources.user.get.path)")!
    Mock(url: url, dataType: .json, statusCode: 200, data: [
        .get: json(named: "user")
    ]).register()

    // When
    let user = try await client.send(Resources.user.get)

    // Then
    XCTAssertEqual(user.login, "kean")
}
cURL #
cURL doesn’t need an introduction. There is an extension to URLRequest that I borrowed from Alamofire that I love. It creates a cURL command for URLRequest.
Ideally, you should call cURLDescription on task’s currentRequest - it’s has all of the cookies and additional HTTP headers automatically added by the system.
Final Thoughts #
Before I started using Async/Await in Swift, I thought it was mostly syntax sugar, but oh how wrong I was. The way Async/Await is integrated into the language is just brilliant. It solves a bunch of common problems in an elegant way and I barely touched the surface in this article. For example, I’m particularly excited about the new threading model that can reduce or eliminate timesharing of threads. In the future async APIs should be defined exclusively using async functions – bye callbacks, bye [weak self].
Actors take full advantage of Async/Await and the new threading model. It’s just as amazing of an addition to the language, and it solves a very common problem. It’s a bit unfortunate that in the case of the API client, I only used them to move work to the background, but there was no mutable state to protect.
If you want to learn more about Async/Await and Structured Concurrency, look no further than this year WWDC session videos. They are all fantastically well made, and, if you want to dive a bit deeper, read the Swift Evolution proposals.
If you just look at the surface level, let’s see how much code I wrote to implement most of the features from this article:
$ cloc Sources/APIClient/.
       2 text files.
       2 unique files.
       0 files ignored.

github.com/AlDanial/cloc v 1.90  T=0.01 s (305.1 files/s, 17795.7 lines/s)
-------------------------------------------------------------------------------
Language                     files          blank        comment           code
-------------------------------------------------------------------------------
Swift                            3             26             11            148
-------------------------------------------------------------------------------
SUM:                             3             26             11            148
-------------------------------------------------------------------------------
It is not a direct comparison, but Alamofire version 5.4.4 has 7428 lines. This is bonkers. And to think how far we’ve come in just about 10 years – remember ASIHTTPRequest?
References
- Meet async/await in Swift (WWDC21)
- Explore structured concurrency in Swift (WWDC21)
- Swift concurrency: Update a sample app (WWDC21)
- Protect mutable state with Swift actors (WWDC21)
- Swift concurrency: Behind the scenes (WWDC21)
- RESTful web API design (Azure / Architecture)
- URL Loading System (Apple)
- Increasing Application Performance with HTTP Cache Headers (Heroku Dev Center)
- RFC 7234. HTTP/1.1 Caching (IETF)
- OpenAPI Initiative
- Introducing GitHub’s OpenAPI Description (GitHub Blog)
- Certificate and Public Key Pinning (OWASP)
- Authentication with signed requests in Alamofire 5 (SwiftLee)
- Secret Management on iOS (NSHipster)
- What is mutual TLS (mTLS)? (Cloudflare)
- Preventing Man-in-the-Middle Attacks in iOS with SSL Pinning (Ray Wanderlich)
- Identity Pinning: How to configure server certificates for your app (Apple)
-
The client is defined as an actor, but in this case, it doesn’t have to be – in the sample code there is no mutable state to protect. But by making it actor, I make sure the requests are created and started in the background. Based on my performance testing in Nuke, creating requests is a relatively expensive operation and it can be advantageous to move it out of the main thread. In the case of the client, it’s just a matter of changing “class” to “actor” – the rest of the APIs are already async, so there is no change in the APIs needed. But it can be swapped out back to “class”. ↩
-
The framework’s
send()method takes a closure with aninout URLRequestas a parameter allowing the user to modify any of theURLRequestproperties. ↩