Updates
- Apr 3, 2021. Replace Preheat (deprecated) with
UICollectionViewprefetching APIs. Add prefetching in SwiftUIList.
Loading data ahead of time in anticipation of its use (prefetching) is a great way to improve user experience. It’s especially effective for images; it can give users an impression that there is no networking and the images are just magically always there.
In this post, I will cover Nuke and image prefetching in UICollectionView and SwiftUI List.
UICollectionView #
Starting with iOS 10, it became easy to implement prefetching in a UICollectionView thanks to the UICollectionViewDataSourcePrefetching API. All you need to do is set isPrefetchingEnabled to true and set a prefetchDataSource.
final class PrefetchingDemoViewController: BaseDemoViewController {
    let prefetcher = ImagePrefetcher()

    override func viewDidLoad() {
        super.viewDidLoad()

        collectionView?.isPrefetchingEnabled = true
        collectionView?.prefetchDataSource = self
    }
}

extension PrefetchingDemoViewController: UICollectionViewDataSourcePrefetching {
    func collectionView(_ collectionView: UICollectionView,
                        prefetchItemsAt indexPaths: [IndexPath]) {
        let urls = indexPaths.map { photos[$0.row] }
        prefetcher.startPrefetching(with: urls)
    }

    func collectionView(_ collectionView: UICollectionView,
                        cancelPrefetchingForItemsAt indexPaths: [IndexPath]) {
        let urls = indexPaths.map { photos[$0.row] }
        prefetcher.stopPrefetching(with: urls)
    }
}
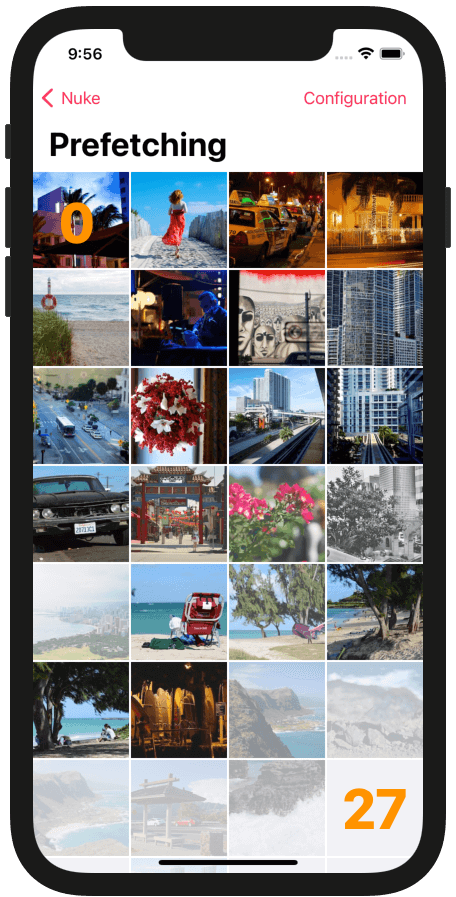
This code sample comes straight from Nuke Demo. So does the following screenshot:

There are 32 items on the screen (the last row is partially visible). When you open it for the first time, the prefetch API asks the app to start prefetching for indices [32-55]. As you scroll, the prefetch “window” changes. You receive cancelPrefetchingForItemsAt calls for items no longer in the prefetch window.
UICollectionViewoffers no customization options. If you want to have more control, check out Preheat. I deprecated it, but you can find it helpful nevertheless.
When the user goes to another screen, you can either cancel all the prefetching tasks (but then you’ll need to figure out a way to restart them when the user comes back) or, with Nuke 9.4.0, you can simply pause them.
override func viewWillAppear(_ animated: Bool) {
    super.viewWillAppear(animated)

    prefetcher.isPaused = false
}

override func viewWillDisappear(_ animated: Bool) {
    super.viewWillDisappear(animated)

    // When you pause, the prefetcher will finish outstanding tasks
    // (by default, there are only 2 at a time), and pause the rest.
    prefetcher.isPaused = true
}
Starting with Nuke 9.5.0, you can also change the prefetcher priority. For example, when the user goes to another screen that also has image prefetching, you can lower it to
.veryLow. This way, the prefetching will continue for both screens, but the top screen will have priority.
ImagePrefetcher #
ImagePrefetcher is part of the Nuke framework. You typically create one prefetcher per screen.
let prefetcher = ImagePrefetcher()

public final class ImagePrefetcher {
    public init(pipeline: ImagePipeline = ImagePipeline.shared,
                destination: Destination = .memoryCache,
                maxConcurrentRequestCount: Int = 2)
}
To start prefetching, call startPrefetching(with:) method. When you need the same image later to display it, simply use the ImagePipeline or view extensions to load the image. The pipeline will take care of coalescing the requests for new without starting any new downloads.
public extension ImagePrefetcher {
    func startPrefetching(with urls: [URL])
    func startPrefetching(with requests: [ImageRequest])

    func stopPrefetching(with urls: [URL])
    func stopPrefetching(with requests: [ImageRequest])
    func stopPrefetching()
The prefetcher automatically cancels all of the outstanding tasks when deallocated. All ImagePrefetcher methods are thread-safe and are optimized to be used even from the main thread during scrolling.
Keep in mind that prefetching takes up users’ data and puts extra pressure on CPU and memory! To reduce the CPU and memory usage, you have an option to choose only the disk cache as a prefetching destination:
ImagePrefetcher(destination: .diskCache). It doesn’t require image decoding and processing and therefore uses less CPU. The images are stored on disk, so they also take up less memory.
With Nuke 9.4.0, you can now also pause prefetching (isPaused), which is useful when the user navigates to a different screen. And starting with Nuke 9.5.0, you can also change the prefetcher priority. For example, when the user goes to another screen, you can lower it to .veryLow.
public extension ImagePrefetcher {
    var isPaused: Bool = false
    var priority: ImageRequest.Priority = .low
}
SwiftUI #
SwiftUI currency doesn’t provide an API for prefetching, and that’s why I built ScrollViewPrefetcher.
ScrollViewPrefetcheris pre-release software, use at your own risk. The API is suboptimal and will most likely change in the future.
As part of the Nuke infrastructure, the ScrollViewPrefetcher demo is available in the central Nuke Demo repository. In this repo, I create a grid of images using LazyVGrid and load images using FetchImage.
import FetchImage

struct PrefetchDemoView: View {
    @StateObject var model = PrefetchDemoViewModel()

    var body: some View {
        GeometryReader { geometry in
            ScrollView {
                let side = geometry.size.width / 4
                let item = GridItem(.fixed(side), spacing: 2)
                LazyVGrid(columns: Array(repeating: item, count: 4), spacing: 2) {
                    ForEach(demoPhotosURLs.indices) { index in
                        ImageView(url: demoPhotosURLs[index])
                            .frame(width: side, height: side)
                            .clipped()
                            .onAppear { model.onAppear(index) }
                            .onDisappear { model.onDisappear(index) }
                    }
                }
            }
        }
    }
}
To update the prefetch window, I use onAppear and onDisappear callbacks. ScrollViewPrefetcher keeps track of which items are visible, what direction the user is scrolling in, and updates the prefetch window accordingly.
import Nuke
import ScrollViewPrefetcher

final class PrefetchDemoViewModel: ObservableObject, ScrollViewPrefetcherDelegate {
    private let imagePrefetcher: ImagePrefetcher
    private let scrollViewPrefetcer: ScrollViewPrefetcher
    let urls: [URL]

    init() {
        self.imagePrefetcher = ImagePrefetcher()
        self.scrollViewPrefetcer = ScrollViewPrefetcher()
        self.urls = demoPhotosURLs

        self.scrollViewPrefetcer.delegate = self
    }

    func onAppear(_ index: Int) {
        scrollViewPrefetcer.onAppear(index)
    }

    func onDisappear(_ index: Int) {
        scrollViewPrefetcer.onDisappear(index)
    }

    // MARK: ScrollViewPrefetcherDelegate

    func getAllIndicesForPrefetcher(_ prefetcher: ScrollViewPrefetcher) -> Range<Int> {
        urls.indices // The prefetcher needs to know which indices are valid
    }

    func prefetcher(_ prefetcher: ScrollViewPrefetcher,
                    prefetchItemsAt indices: [Int]) {
        imagePrefetcher.startPrefetching(with: indices.map { urls[$0] })
    }

    func prefetcher(_ prefetcher: ScrollViewPrefetcher,
                    cancelPrefechingForItemAt indices: [Int]) {
        imagePrefetcher.stopPrefetching(with: indices.map { urls[$0] })
    }
}