With most of the groundwork covered in “How Does VPN Work?”, let’s go ahead and design a protocol.
Designing a Protocol #
I want the protocol to be functional, but keep it as simple as possible. The goal is not to design a viable VPN protocol, but to demonstrate Network Extension framework.
There are three things that our protocol is going to need to be able to do:
- Establish a secure connection
- Authenticate the user based on username and password
- Provide a way to send encrypted IP packets – the actual network traffic – over the network
Encryption #
The industry standard for secure connections is TLS. A typical VPN protocol would use asymmetric cryptography to allow the client and the server to establish a secure connection and share a symmetric encryption key (hybrid encryption). However, to keep things simple, I’m going to use a pre-shared key.
Warning!
Don’t rely on this article for the security advice. If you are implementing a VPN protocol, you might want to use a TLS implementation provided by Apple in Network framework. Use this framework when you need direct access to protocols like TLS, TCP, and UDP for your custom application protocols. There is an example project provided by Apple which demonstrates how to use their TLS implementation.
Control Packets #
There are two types of packets the client and the server need to be able to exchange: control packets and data packets. To distinguish between packets, we are going to need a header. I’m going to define my protocol as a Swift library, so let’s start adding some code.
/// The VPN protocol header.
public struct Header {
    public let code: PacketCode

    /// There is only one one-byte fields in the header.
    public static let length = 1
}

public enum PacketCode: UInt8 {
    /// A control packet containing client authentication request (JSON).
    case clientAuthRequest = 0x01
    /// A control packet containing server authentication response (JSON).
    case serverAuthResponse = 0x02
    /// A data packet containing encrypted IP packets (raw bytes).
    case data = 0x03

    /// Initializes the code code with the given UDP packet contents.
    public init(datagram: Data) throws {
        guard datagram.count > 0 else {
            throw PacketParsingError.notEnoughData
        }
        guard let code = PacketCode(rawValue: datagram[0]) else {
            throw PacketParsingError.invalidPacketCode
        }
        self = code
    }
}
The body of the packets can be anything you want. In my case, I’m going to stick with simple JSON for control packets.
public enum Body {
    public struct ClientAuthRequest: Codable {
        public let login: String
        public let password: String

        public init(login: String, password: String) {
            self.login = login
            self.password = password
        }
    }

    /// ...
}
Data Packets #
To exchange actual network traffic (IP packets), I’m going to use PacketCode.data and put the raw (encrypted) data in body.
Transport #
NEPacketTunnelProvider provides you two ways to send packets inside your private network:
- UDP:
createUDPSession - TCP:
createTCPConnection
We could use either of these options. UDP is typically going to be faster, it is easier to use, and it is a preferred way in some of the existing VPN protocols, such as OpenVPN. You don’t need the reliability guarantees of TCP in case of the VPN protocols – the goal is to send opaque IP packets as quickly as possible over the wire, the reliability is the concern of the protocols encapsulated in the IP packets.
Packet Tunnel Provider #
The primary API for implementing your custom tunneling protocols in NEPacketTunnelProvider, that allows you to tunnel traffic on an IP layer. They run as app extensions in the background handling network traffic.
There is also an NEAppProxyProvider which is another subclass of the abstract
NETunnelProviderclass. It allows you to implement tunneling on a higher, app level. UnlikeNEPacketTunnelProvider, it requires a device to be supervised and it only works for managed apps. It operates on a TCP/UDP level instead of IP level.
To configure and control a network provider from your app, you use NETunnelProviderManager family of APIs, which I covered in the previous post.
So, how does it work? Suppose you have a NEPacketTunnelProvider running on the system, connected to a VPN server and providing a tunnel to some internal network. An app wants to get some resource on the network. The app creates a socket, and a TCP/IP connection.
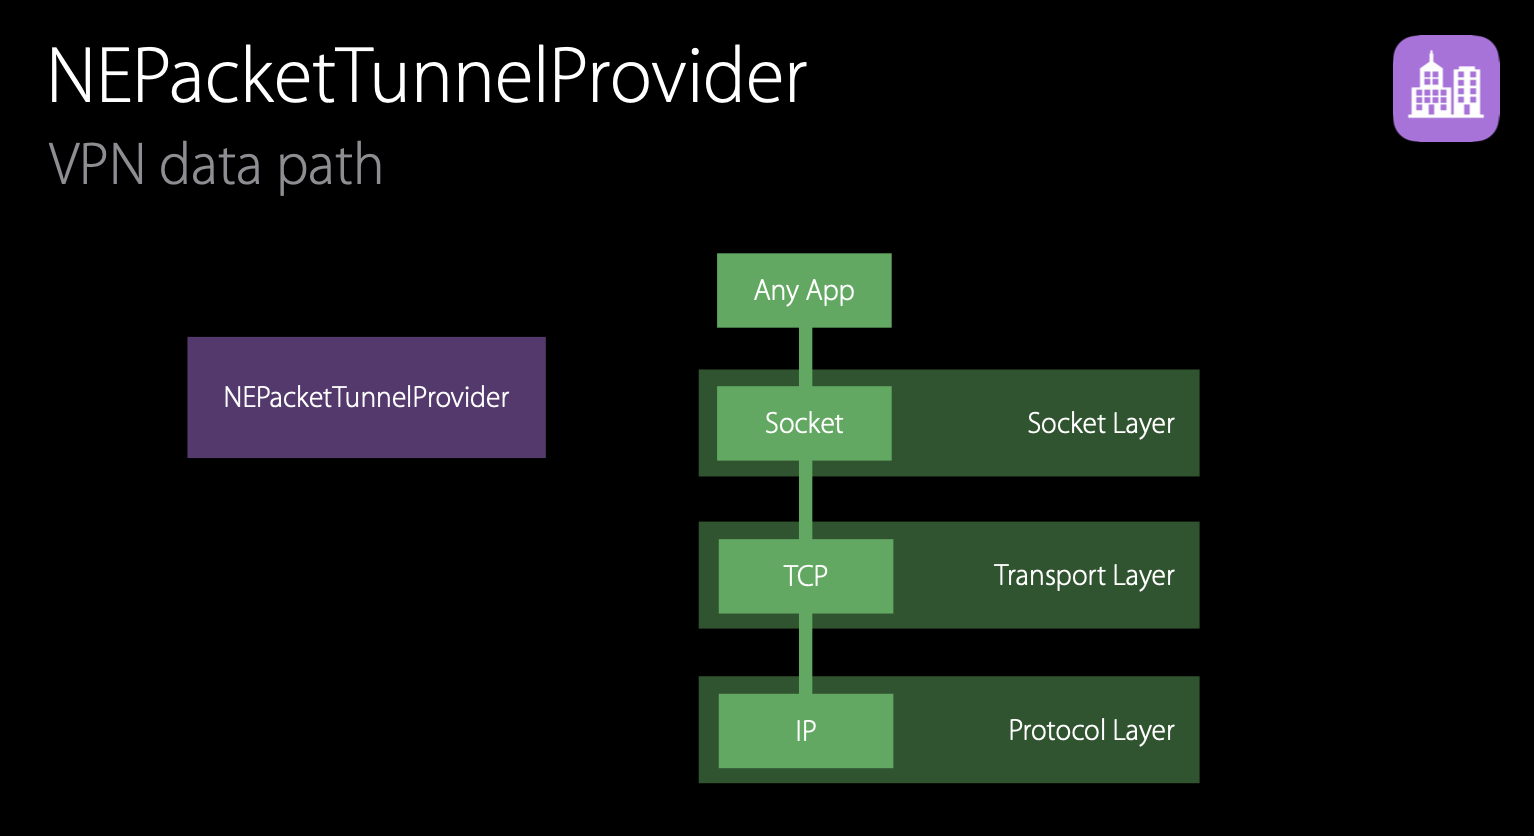
The packets for this TCP/IP connection are routed to a virtual utun0 network interface. Instead of sending packets over the network, the system diverts the packets to the active NEPacketTunnelProvider.
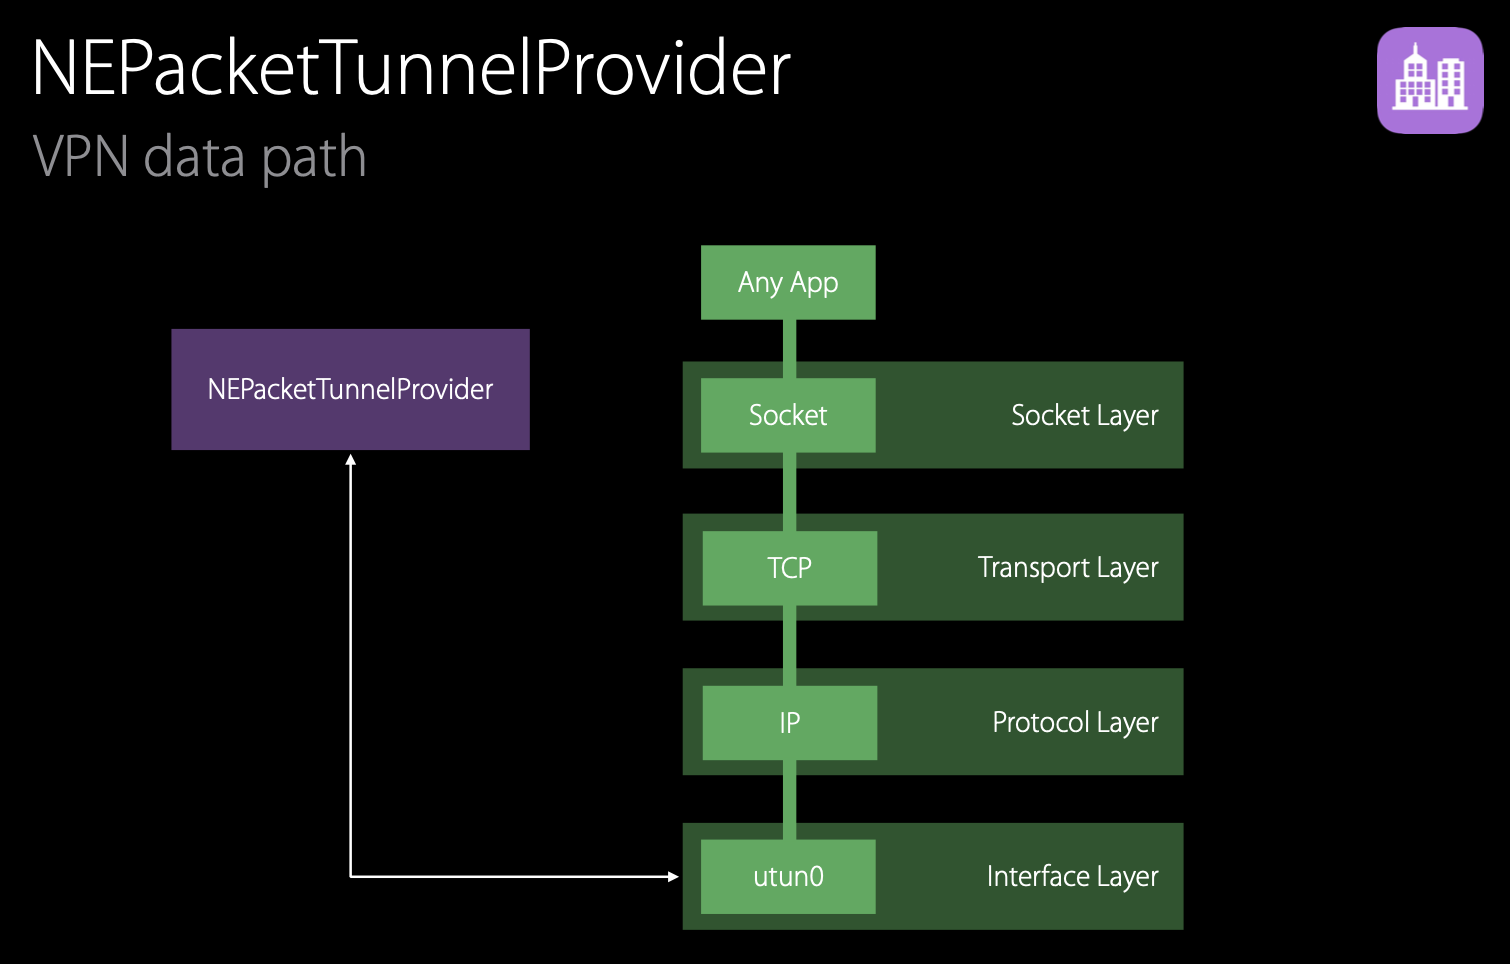
The tunnel provider uses NEPacketTunnelFlow to read the IP packets (readPackets(completionHandler:)) from the virtual interface. It then encapsulates the packets in your tunneling protocol and sends them over to the tunneling server. The server will decapsulate them, and inject the IP packets into the network to send them to their ultimate destination. The responses are sent back to the client in a similar fashion (encapulate-send-decapsulate), and are injected back into the client networking using NEPacketTunnelFlow and utun0 virtual interface (writePackets(_:withProtocols:)). They will be delivered back to the TCP/IP stack, and back to the application.
The NEPacketTunnelProvider has a lot of control over the utun0 interface. Most importantly, it can specify the routes – the destination that will be routed to the utun0 interface and through the tunnel.
You can learn more about
NEPacketTunnelProviderin the documentation, and in WWDC What’s New in NetworkExtension and VPN session video.
VPN Tunnel #
The packet tunnel provider extension that I created in the previous post has a file with a NEPacketTunnelProvider subclass. This is the entry point of the extension. When the extension is started, an instance of this class is initialized and the startTunnel method is called.
When the Packet Tunnel Provider executes the completionHandler closure with a nil error parameter, it signals to the system that it is ready to begin handling network data. Therefore, the Packet Tunnel Provider should call setTunnelNetworkSettings(_:completionHandler:) and wait for it to complete before executing the completionHandler block.
The domain and code of the NSError object passed to the
completionHandlerblock are defined by the Packet Tunnel Provider (NEVPNError).
class PacketTunnelProvider: NEPacketTunnelProvider {
    override func startTunnel(options: [String: NSObject]?,
                              completionHandler: @escaping (Error?) -> Void) {

    }
}
Establish Connection #
The first thing you need to do is read the configuration set by the container app.
override func startTunnel(options: [String: NSObject]?, completionHandler: @escaping (Error?) -> Void) {
    os_log(.default, log: log, "Starting tunnel, options: %{private}@", "\(String(describing: options))")

    do {
        guard let proto = protocolConfiguration as? NETunnelProviderProtocol else {
            throw NEVPNError(.configurationInvalid)
        }
        self.configuration = try Configuration(proto: proto)
    } catch {
        completionHandler(error)
    }

    // ...
}
NETunnelProviderProtocol has some built-in fields, such as username and passwordReference, but you can also provide custom configuration using providerConfiguration field.
private struct Configuration {
    let username: String
    let password: String
    let address: String

    init(proto: NETunnelProviderProtocol) throws {
        guard let serverAddress = proto.serverAddress else {
            throw NEVPNError(.configurationInvalid)
        }
        self.address = serverAddress

        guard let username = proto.username else {
            throw NEVPNError(.configurationInvalid)
        }
        self.username = username

        guard let password = proto.passwordReference.flatMap({
            Keychain.password(for: username, reference: $0)
        }) else {
            throw NEVPNError(.configurationInvalid)
        }
        self.password = password
    }
}
Once you have the configuration, you need to establish a connection to a server. As I mentioned previously, my protocol is based on UDP, so I’m going to use createUDPSession(to:from:) method which is going to return NWUDPSession for me.
class PacketTunnelProvider: NEPacketTunnelProvider {
    private var session: NWUDPSession!
    private var observer: AnyObject?
    private var pendingCompletion: ((Error?) -> Void)?

    override func startTunnel(options: [String: NSObject]?, completionHandler: @escaping (Error?) -> Void) {
        // ... (read configuration)

        self.pendingCompletion = completionHandler
        self.startUDPSession()
    }

    private func startUDPSession() {
        let endpoint = NWHostEndpoint(hostname: configuration.address, port: configuration.port)
        self.session = self.createUDPSession(to: endpoint, from: nil)
        self.observer = session.observe(\.state, options: [.new]) { session, _ in
            if session.state == .ready {
                // The session is ready to exchange UDP datagrams with the server
            }
        }
    }
}
The code that you see in this section is simplified to highlight the key points. You can find the complete implementation at kean/vpn.
You can either initiate NWHostEndpoint with an IP address or with a domain name. NWUDPSession performs DNS resolution for you.
Once the connection is established, you can start exchanging UDP datagrams with a server. The first thing you need to do is authenticate, using a custom control packet. I’m using my BestVPN library to create headers, bodies, and serialize them.
private func sessionDidBecomeReady() {
    session.setReadHandler({ [weak self] datagrams, error in
        guard let self = self else { return }
        self.queue.async {
            self.didReceiveDatagrams(datagrams: datagrams ?? [], error: error)
        }
    }, maxDatagrams: Int.max)

    do {
        try self.authenticate(username: configuration.username, password: configuration.password)
    } catch {
        // TODO: handle errors
        os_log(.default, log: self.log, "Did fail to authenticate: %{public}@", "\(error)")
    }
}

private func authenticate(login: String, password: String) {
    let datagram = try MessageEncoder.encode(
        header: Header(code: .clientAuthRequest),
        body: Body.ClientAuthRequest(login: username, password: password),
        key: key
    )

    udpSession.writeDatagram(datagram) { error in
        if let error = error {
            // TODO: Handle errors
            os_log(.default, log: self.log, "Failed to write auth request datagram, error: %{public}@", "\(error)")
        }
    }
}

private func sessionDidReceiveDatagrams(_ data: [Data]) {
    // Wait for the authentication response from the server
}
Warning!
I’m again warning you that I’m using a hardcoded encryption key in the demo for simplicity. In reality, you are going to use a proper TLS handshake or a similar approach. Don’t rely on this article for the security advice!
Once the authentication request is sent, I’m going to then set up a handle and wait for a UDP datagram from the server acknowledging the authentication.
private func didReceiveDatagram(datagram: Data) throws {
    let code = try PacketCode(datagram: datagram)

    os_log(.default, log: self.log, "Did receive datagram with code: %{public}@", "\(code)")

    switch code {
    case .serverAuthResponse:
        let response = try MessageDecoder.decode(Body.ServerAuthResponse.self, datagram: datagram, key: key)
        os_log(.default, log: self.log, "Did receive auth response: %{private}@", "\(response)")
        if response.isOK {
            // TODO: In reality, you would pass a resolved IP address, in our
            // case we already provide an IP address in the configuration
            self.didSetupTunnel(address: configuration.hostname)
        } else {
            // TODO: Handle error
        }
        self.timeoutTimer?.invalidate()
    default:
        break
    }
}

/// - parameter address: The address of the remote endpoint that is providing the tunnel service.
private func didSetupTunnel(address: String) {
    let settings = NEPacketTunnelNetworkSettings(tunnelRemoteAddress: address)
    // Configure DNS/split-tunnel/etc settings if needed

    setTunnelNetworkSettings(settings) { error in
        self.pendingCompletion?(nil)
        self.pendingCompletion = nil

        self.didStartTunnel()
    }
}
NEPacketTunnelNetworkSettingsprovides a configuration for a packet tunnel provider’s virtual interface. There are some interesting things that you can do such set custom DNS addresses, configure split tunnel, and more. I’m going to cover this in the upcoming bonus article.
Send Traffic #
Now, how do you actually send the traffic from the system through the tunnel? A packet tunnel provider has a packetFlow property returning a NEPacketTunnelFlow object which is used to receive IP packets routed to the tunnel’s virtual interface and inject IP packets into the networking stack via the tunnel’s virtual interface.
private func didStartTunnel() {
    readPackets()
}

private func readPackets() {
    packetFlow.readPacketObjects { packets in
        do {
            let datagrams = try packets.map {
                try MessageEncoder.encode(
                    header: Header(code: .data),
                    body: $0.data,
                    key: key
                )
            }
            self.session.writeMultipleDatagrams(datagrams) { error in
                // TODO: Handle errors
            }
        } catch {
            // TODO: Handle errors
        }

        self.readPackets()
    }
}
That’s what you do to send the packets out. Coming back it’s very similar. When I receive new UDP datagram over the connection, decrypt them and write them into the packet flow. Let’s extend our UDP session readPackets handler to do just that.
private func didReceiveDatagram(datagram: Data) throws {
    let code = try PacketCode(datagram: datagram)
    switch code {
    case .serverAuthResponse:
        // ...
    case .data:
        let data = try MessageDecoder.decode(Data.self, datagram: datagram, key: key)
        let proto = protocolNumber(for: data)
        self.packetFlow.writePackets([data], withProtocols: [proto])
    default:
        break
    }
}
References
- Apple Developer Documentation, NetworkExtension Framework
- WWDC 2017, Session 707: Advances in Networking, Part 1
- WWDC 2017, Session 709: Advances in Networking, Part 2
- WWDC 2015, Session 717: What’s New in NetworkExtension and VPN
- OpenVPN, Why does OpenVPN use UDP and TCP?)